Textured wall art is greater than only a decorative piece; it’s a creative expression that transforms ordinary walls into charming focal points. With its ability to feature intensity and size, it brings man or woman and heat to any area. Whether you’re interested in minimalist designs or bold, complicated patterns, textured wall artwork gives endless opportunities to healthy your style.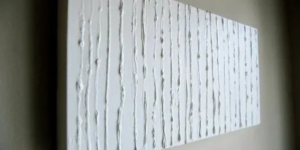
Imagine the pleasure of making your personal masterpiece, custom designed to mirror your persona. Crafting textured wall artwork is not just an artistic undertaking; it’s a healing pastime that anybody can revel in. From novices experimenting with easy strategies to seasoned artists exploring complicated designs, the manner is as rewarding because the very last product.
The first-rate component? Learning the way to make textured wall art doesn’t require costly substances or advanced abilties. With a few primary equipment, a chunk of endurance, and a sprint of creativity, you could create beautiful portions that rival keep-offered artwork. This manual will walk you through each step, inspiring you to convert blank partitions into works of artwork.
Table of Contents
What is Textured Wall Art?
Why Create Textured Wall Art?
Materials Needed for Textured Wall Art
Step-with the aid of-Step Guide on How to Make Textured Wall Art
Choosing Your Canvas
Preparing Your Workspace
Exploring Texturing Techniques
Design Ideas and Inspirations
Tips for Success
FAQs approximately How to Make Textured Wall Art
Final Thoughts
What is Textured Wall Art?
Textured wall art is a shape of paintings that includes 3-dimensional elements, creating a tactile floor. It goes past flat paintings with the aid of adding bodily intensity thru mediums like plaster, modeling paste, fabric, or herbal elements. The result is a hanging piece of artwork that interacts with light and shadow, making it a focal point in any room.
Why Create Textured Wall Art?
There are several motives to create your personal textured wall art:
Personalization:
It displays your unique taste and creativity.
Cost-Effective:
DIY textured artwork is frequently extra lower priced than purchasing from stores.
Therapeutic:
Engaging in inventive activities can reduce stress and boost mental well-being.
Aesthetic Appeal:
It adds depth and dimension, enhancing the general environment of your space.
Materials Needed for Textured Wall Art
To start your task, accumulate the following materials:
Essential Supplies:
Canvas or wood panel
Acrylic paints or oil paints
Modeling paste or joint compound
Palette knives or spatulas
Brushes (numerous sizes)
Water spray bottle
Sandpaper
Painter’s tape
Drop cloth or old newspapers
Optional Tools and Materials:
Stencils for patterns
Natural factors (leaves, twigs, or shells)
Fabric or lace for imprints
Gold leaf or steel accents
Rolling pins for smoothing
Step-by-Step Guide on How to Make Textured Wall Art
Here’s a detailed manual on the way to make textured wall artwork from scratch:
Choosing Your Canvas
The canvas is the inspiration of your textured wall artwork. You can use a traditional stretched canvas, wood board, or maybe repurposed materials like antique furnishings panels. Ensure the surface is strong enough to hold layers of texturing cloth.
Preparing Your Workspace
Cover your paintings vicinity with a drop cloth or antique newspapers to shield towards spills. Organize your tools and substances inside smooth attain. Adequate air flow is critical, mainly while running with paints and modeling paste.
Planning Your Design
Sketch a hard idea of your design on paper. Decide whether or not you want abstract textures, geometric patterns, or nature-stimulated designs. This step will manual your utility technique.
Applying Base Layers
Start through making use of a base coat of paint to your canvas. Use a neutral color to create a basis to your layout.
Allow the paint to dry completely earlier than shifting to the next step.
Adding Texture
This is wherein the fun starts of evolved! There are several ways to add texture:
Using Modeling Paste
Apply modeling paste or joint compound onto the canvas with a palette knife.
Create styles the use of brushes, stencils, or your fingers.
Let the paste dry for a few hours earlier than adding paint.
Incorporating Natural Elements
Press leaves, shells, or twigs into the moist paste.
Remove them carefully to depart an imprint, or depart them attached for added measurement.
Fabric and Lace
Press lace or cloth into the paste to create tricky patterns.
Remove the material gently after a few minutes.
Painting the Textures
Once the feel is dry, paint over it the usage of acrylic or oil paints. Experiment with:
Dry brushing for highlighting raised areas.
Layering col
Design Ideas and Inspirations
If you are unsure wherein to start, here are some layout thoughts:
Abstract Patterns:
Use random strokes and layers to create an expressive piece.
Geometric Shapes:
Incorporate easy traces and symmetrical styles.
Nature Themes:
Imprint leaves, plants, or waves for an organic touch.
Monochromatic Textures:
Stick to a single color palette for a minimalist look.
Boho Chic:
Add tassels or feathers on your textured artwork.
Tips for Success
Here are a few practical guidelines to make certain your task turns out superbly:
Start Small:
Begin with a small canvas in case you’re new to textured art.
Test Techniques:
Practice on scrap portions earlier than making use of textures on your final canvas.
Layer Gradually:
Build texture in layers to avoid cracking.
Mix and Match:
Combine exclusive substances and techniques for specific outcomes.
Be Patient:
Allow each layer to dry absolutely earlier than including the subsequent.
FAQs About How to Make Textured Wall Art
What is the excellent material for developing texture?
Modeling paste and joint compound are extensively used for his or her versatility and ease of use. They adhere nicely to maximum surfaces and can be shaped into diverse patterns.
Can I use household objects to create textures?
Absolutely! Items like sponges, combs, and bubble wrap can be used to create thrilling styles.
How long does it take to finish a textured wall art project?
The time varies depending at the complexity of your layout and drying instances. Simple initiatives may additionally take a few hours, even as distinctive ones ought to take several days.
Do I want to prime my canvas earlier than including texture?
Priming your canvas with gesso guarantees higher adhesion and toughness in your artwork.
Can I hold textured wall artwork exterior?
If you plan to show your art work outdoors, use weatherproof materials and sealants to defend it from the factors.
Final Thoughts
Learning a way to make textured wall artwork opens up a international of creative opportunities. It’s a satisfying manner to feature personality to your house while exploring your inventive side. By following this manual, you’ll have the know-how and confidence to craft lovely textured pieces that captivate and inspire. So collect your materials, unleash your creativeness, and allow your walls inform a story!