Stained wooden has a timeless enchantment, results easily improving the splendor and heat of furnishings, floors, and different wooden accents. But as format trends evolve or non-public choices shift, the unique colour also can now not supplement your space. Imagine giving your wood portions a smooth, current appearance without the rate or trouble of full alternative. It’s definitely viable, and with the proper steps, the transformation may be each profitable and seamless.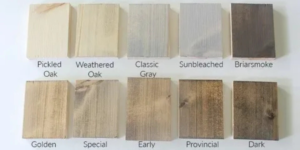
Have you ever looked at your stained timber furnishings or flooring and puzzled if a distinctive color would better fit your evolving aesthetic? Whether you need a darker, richer tone or a lighter, airier sense, changing the color of stained wooden is a extraordinary manner to refresh your interiors. By studying the strategies for training and alertness, you could acquire a finish that now not satisfactory seems professional however moreover stands the check of time.
Changing the shade of stained timber is a technique that calls for staying electricity and attention to detail, however the outcomes are well worth the attempt. Through proper sanding, cleansing, and alertness, you can make certain the contemporary stain adheres calmly, highlighting the herbal grain of the wood. Whether you are updating a single piece of furnishings or a whole room, taking the time to do it right will yield a end that feels each smooth and timeless.
Understanding Stained Wood
Before you begin, it’s essential to recognize what stained wood is and how it differs from painted or untreated wooden. Stain penetrates the timber’s floor, enhancing its natural grain whilst including color. Unlike paint, which bureaucracy a solid layer on top, stain becomes part of the wooden’s floor. This approach converting the color of stained wood requires precise techniques to attain the desired end result.
The key to efficiently converting the coloration of stained wooden lies in training, method, and staying power. Whether you’re looking to darken, lighten, or completely regulate the hue, following the proper steps will ensure a wonderful end.
Tools and Materials Needed
To exchange the color of stained timber, gather the following tools and substances:
Tools:
Sandpaper (80-grit, a hundred and twenty-grit, and 220-grit)
Sanding block or electric powered sander
Clean cloths or tack cloths
Paintbrushes or foam brushes
Putty knife (optionally available for maintenance)
Masking tape
Drop cloth or defensive plastic sheeting
Materials:
Wood stain (new color of your desire)
Wood conditioner (elective however endorsed)
Wood filler (if needed for repairs)
Protective end (polyurethane, lacquer, or oil-primarily based end)
Mineral spirits or stain remover
Cleaning solution (mild cleaning soap or wood cleaner)
Step-by-Step Guide: How to Change the Color of Stained Wood
Assess the Existing Finish
Before you begin, have a look at the cutting-edge end to your stained wooden. Is the wooden sealed with a protective topcoat like polyurethane, or is it really stained? If the timber has a topcoat, you’ll need to remove it earlier than applying a brand new stain. Use mineral spirits or a chemical stripper for this venture.
Clean the Surface
Dirt, grease, and dirt can interfere with the staining process. Clean the timber very well with a slight soap solution or a specialized wooden cleanser. Wipe the floor with a damp fabric and permit it to dry absolutely.
Sand the Wood
Sanding is a critical step when learning how to change the color of stained wood. Sanding removes the old stain and prepares the wood for a new finish. Follow these steps:
Start with coarse sandpaper (80-grit):
This will cast off the majority of the antique stain and any protective finish.
Switch to medium sandpaper (one hundred twenty-grit):
Smooth out the floor and dispose of any final stain.
Finish with great sandpaper (220-grit):
Create a smooth surface for even stain absorption.
After sanding, wipe away all dust with a tack fabric or a humid cloth to ensure a clean surface.
Apply a Wood Conditioner
A wood conditioner enables make sure even absorption of the stain, particularly on porous woods like pine or oak. Follow the manufacturer’s commands to apply the conditioner and allow it sit down for the advocated time before proceeding.
Test the New Stain
Before committing to the brand new colour, check the stain on a small, inconspicuous region of the wood. This will come up with an concept of how the stain will appearance and will let you adjust your technique if needed.
Apply the New Stain
When applying the new stain, work in sections to ensure even coverage. Here’s how to do it:
Use a brush or foam applicator:
Apply the stain within the path of the wooden grain.
Wipe away extra stain:
Use a easy fabric to take away more stain after a couple of minutes. The longer you leave the stain, the darker the shade might be.
Let it dry:
Allow the stain to dry completely according to the manufacturer’s instructions. This can take anywhere from some hours to in a single day.
Apply a Second Coat (Optional)
If the primary coat doesn’t collect the favored depth of shade, observe a second coat of stain. Follow the identical system due to the fact the first coat, making sure even software and wiping away extra stain.
Seal the Wood
To protect the newly stained wood and enhance its durability, apply a protective topcoat. Choose from the following options based on your preferences:
Polyurethane:
Offers a long lasting, glossy or matte end.
Lacquer:
Provides a excessive-gloss, long lasting end but calls for more talent to use.
Oil-primarily based finish:
Enhances the herbal grain of the wood for a rich, warm look.
Use a broom to apply the topcoat in thin, even layers. Allow it to dry fully between coats and gently sand with satisfactory-grit sandpaper if wished.
Tips for Changing the Color of Stained Wood
Work in a well-ventilated area:
Stains and finishes emit fumes that may be harmful if inhaled in huge quantities. Always work in a area with top airflow.
Wear defensive equipment:
Use gloves, protection goggles, and a masks to defend your self from dirt and chemicals.
Be affected person:
Rushing the process can lead to uneven staining or a terrible finish. Allow every step to dry absolutely before shifting on.
Practice on scrap timber:
If you’re new to staining, exercise your approach on a spare piece of timber earlier than tackling your fundamental venture.
Darkening Stained Wood
If you’re looking to darken stained wooden, the method is surprisingly sincere. You can apply a darker stain over the existing stain with out absolutely casting off it, however be sure to sand the floor gently to permit the brand new stain to adhere.
Clean and lightly sand the timber.
Apply the darker stain as defined in advance.
Seal the timber with a defensive finish.
Lightening Stained Wood
Lightening stained wood is more challenging but can be done with the right tools and patience. Here are the steps:
Strip the old stain:
Use a chemical wooden stripper to get rid of the prevailing stain.
Sand the timber:
Thoroughly sand the floor to do away with any closing coloration.
Bleach the timber:
Use a wood bleach option to lighten the herbal tone of the timber. Follow the producer’s instructions carefully.
Apply a lighter stain:
Choose a light or herbal stain to reap your favored appearance.
Common Mistakes to Avoid
Skipping sanding:
Failing to sand well can bring about uneven staining and a patchy end.
Not trying out the stain:
Always take a look at the brand new stain on a small area to make certain it’s the proper color.
Over-applying stain:
Too tons stain can lead to blotchiness and a sticky end. Wipe away extra right away.
Ignoring drying times:
Allow each coat of stain and finish to dry completely to keep away from smudging or peeling.
Maintenance Tips for Stained Wood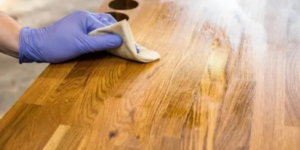
To keep your newly stained wooden searching its quality, observe these Maintenance recommendations:
Dust frequently:
Use a mild, dry cloth to remove dust and debris.
Avoid harsh cleaners:
Use mild soap and water for cleaning.
Protect from moisture:
Use coasters, placemats, or rugs to prevent water damage.
Reapply give up as wanted:
Over time, the protective topcoat may additionally additionally placed on down. Reapply as needed to hold the wood’s appearance and durability.
FAQs
Can you change the shade of stained timber without sanding?
While sanding is usually recommended for the terrific effects, you could lightly sand or use a chemical stripper to put together the ground for a new stain.
What gadget do I want to exchange the color of stained wood?
You’ll need sandpaper, brushes, timber stain, a timber conditioner, and a defensive topcoat.
Can I take a look at a lighter stain over a darker stain?
No, to lighten stained wood, you need to strip the vintage stain, sand the floor, and workout a timber bleach if critical.
How do I check the state-of-the-art stain colour?
Apply the cutting-edge stain on a small, hidden location of the wooden to make certain it suits your selected look.
What is the best way to darken stained timber?
Clean the wooden, gently sand the floor, and observe a darker stain in even layers for the top notch quit end result.
Do I need to apply a timber conditioner?
A wood conditioner is non-obligatory however encouraged for even stain absorption, especially on porous woods.
How lengthy want to I permit the stain dry in advance than sealing?
Allow the stain to dry in reality in keeping with the producer’s commands, commonly some hours to in a single day.
Can I use ordinary household cleaners on stained timber?
No, use moderate cleaning soap and water or specialised timber cleaners to avoid adverse the give up.
What need to I do if my stained timber appears blotchy?
Sand the floor lightly, have a look at a wood conditioner, and reapply the stain to ensure easy consequences.
What topcoat want to I use to shield the modern-day stain?
Use polyurethane, lacquer, or an oil-based definitely finish to decorate sturdiness and defend the stain.
Conclusion
Changing the shade of stained wood is a rewarding DIY mission that may breathe new lifestyles into your wood fixtures, floors, or decor. By following the stairs outlined on this guide, you could reap a professional-pleasant end and create a look that suits your fashion. Remember, preparation and patience are key to fulfillment. Now which you know a way to trade the shade of stained wood, you’re geared up to embark on your subsequent woodworking undertaking with self assurance!