Transforming your darkish timber fixtures right into a lighter, rustic centerpiece can instantly refresh your area. Whitewashing is a versatile approach that now not best lightens heavy fixtures but additionally preserves the natural grain of the timber. It’s an low cost, innovative manner to provide your interiors a clean appearance without replacing your loved one pieces.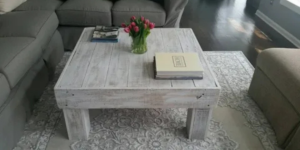
Whether you’re after a captivating antique cottage vibe or a swish present day aesthetic, whitewashing dark timber furniture fits flawlessly with almost any fashion. This DIY technique is easy, even for beginners, and might flip an old piece right into a beautiful announcement. Plus, it’s a amusing way to customize your décor at the same time as staying on finances.
The system involves only a few primary tools, some staying power, and a chunk of creativity. With step-via-step steerage, you may gain a ideal, expert-looking finish at domestic. From sanding the floor to applying the right blend of paint and water, each step plays a vital function in bringing out the timber’s natural splendor.
Why Whitewash Dark Wood Furniture?
Whitewashing is a time-tested method of completing timber that creates a diffused, washed-out appearance. Here’s why you need to recollect whitewashing your dark wooden furniture:
Brightens Up Your Space:
Dark wood can on occasion make rooms feel smaller and heavier. Whitewashing adds lightness and heat, making your furnishings combination seamlessly into diverse decor patterns.
Preserves the Wood Grain:
Unlike paint, whitewashing lets in the herbal beauty of the wooden grain to reveal thru, developing a rustic and herbal finish.
Cost-Effective Makeover:
Instead of changing old furnishings, whitewashing gives a budget-friendly way to offer it a brand new hire on existence.
Customizable:
You can manipulate the opacity of the whitewash to reap your preferred look, from a diffused wash to a more opaque end.
Now that we’ve protected the advantages, allow’s dive into the stairs for a way to whitewash darkish wood furniture.
Tools and Materials Needed
Before you begin, accumulate the following equipment and substances:
Sandpaper (80-grit and 220-grit)
Sanding block or electric powered sander
Clean, lint-unfastened cloths
Tack cloth or vacuum
Paintbrush (herbal bristle works first-class)
White paint (latex or chalk paint)
Water or paint thinner
Mixing field
Drop cloth or plastic sheeting
Protective gloves
Polyurethane or wax sealer (non-compulsory)
Having all the materials equipped ensures a clean workflow as you whitewash darkish wooden fixtures.
Step-by-Step Guide: How to Whitewash Dark Wood Furniture
Prepare Your Workspace
Set up a easy, nicely-ventilated workspace before starting the venture. Lay down a drop fabric or plastic sheeting to guard your floor from dirt and spills. Ensure that your fixtures is located on a solid surface, permitting you to work on it effectively.
Clean the Furniture
The first step is to easy your dark wooden furniture thoroughly. Use a mild cleaning soap or wood purifier to take away dirt, grease, and grime. Let the furniture dry completely earlier than shifting on to the following step.
Sand the Surface
Sanding is vital for attaining a good whitewash finish. Here’s a way to do it:
Start with eighty-grit sandpaper to get rid of any existing finishes, which includes varnish, paint, or stain. Focus on regions with uneven surfaces or imperfections.
Switch to 220-grit sandpaper for smoothing the wooden and preparing it to absorb the whitewash calmly.
After sanding, wipe the furnishings with a tack fabric or vacuum it to take away all dirt debris.
Mix Your Whitewash Solution
To create the whitewash answer, dilute your white paint with water or paint thinner. A appropriate beginning ratio is 2 components paint to 1 element water. For a more obvious finish, increase the water content material. Mix the solution very well in a container until you reap a clean, steady texture.
Test the Whitewash on a Small Area
Before making use of the whitewash to the complete piece, take a look at it on a hidden region or scrap piece of wooden. This allows you to adjust the ratio of paint to water and make sure you’re glad with the shade and opacity.
Apply the Whitewash
Now comes the fun component: applying the whitewash. Follow those steps:
Dip your brush gently into the whitewash solution and wipe off any excess on the side of the box.
Work in small sections, brushing alongside the path of the wood grain.
Use a lint-loose material to wipe away excess whitewash, blending it into the timber for a natural look. You can adjust the amount of whitewash you depart on the wood to obtain the desired finish.
Continue this technique till the complete piece is included.
Let It Dry
Allow the fixtures to dry absolutely. Depending at the paint and environmental conditions, this may take 2-6 hours. Avoid making use of a second coat until the first coat is absolutely dry.
Apply a Second Coat (Optional)
If you want a more opaque appearance, observe a 2d coat of whitewash following the equal technique. Make certain the first coat is dry earlier than adding any other layer.
Seal the Finish (Optional)
To defend your whitewashed furnishings, observe a sealer which include polyurethane or wax. This step is especially critical for fixtures exposed to heavy use or moisture, which include dining tables or outdoor portions. Use a clear sealer to hold the whitewashed appearance.
Tips for Best Results
Use Light Strokes: Avoid overloading your brush with whitewash to prevent drips and choppy coverage.
Work in Sections:
Focusing on small regions at a time ensures better manipulate and consistency.
Maintain the Wood Grain:
Always brush in the direction of the grain to highlight the wood’s natural texture.
Experiment with Layers:
If you’re uncertain about the look, begin with a light coat and progressively increase for your favored end.
Don’t Skip Sanding:
Proper sanding ensures that the whitewash adheres frivolously and lasts longer.
Frequently Asked Questions
Can You Whitewash Furniture Without Sanding?
It is recommended that you sand furniture before painting it, but if the furniture is in good condition and there is no existing finish, you can whitewash it without sanding.
What Type of Paint Should I Use for Whitewashing?
Chalk paint is popular for creating a rustic or shabby-chic look when whitewashing dark wood furniture.
How Long Does Whitewashing Take?
The time it takes to whitewash furniture depends on its size and the number of coats applied. On average, it takes 1-2 days from start to finish, including drying time.
Can I Whitewash Outdoor Furniture?
It is possible to whitewash outdoor furniture, but it should be sealed with a weather-resistant sealer to protect it against moisture and UV light.
How Do I Maintain Whitewashed Furniture?
Keep your whitewashed furniture looking fresh by following these steps:
It should be cleaned regularly with a soft cloth and mild cleaning solution.
Cleaners that contain abrasives or scrubbing tools should be avoided.
If your outdoor furniture needs to be sealed, reapply the sealer as necessary.
Common Mistakes to Avoid
Skipping the Cleaning Step: Dirt and grease can save you the whitewash from adhering nicely.
Over-Sanding:
Excessive sanding can damage the timber’s texture, making it difficult to gain a herbal end.
Using Too Much Paint:
Applying a thick layer of whitewash can difficult to understand the wooden grain, defeating the reason of this method.
Rushing the Drying Process:
Allow every coat to dry absolutely to avoid smudging or peeling.
Ignoring Safety Precautions: Always put on defensive gloves and paintings in a well-ventilated place to avoid inhaling dirt or fumes.
Creative Ideas for Whitewashed Furniture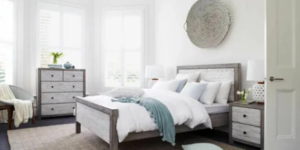
Whitewashing isn’t limited to a specific style. Here are some creative ways to use this technique:
After whitewashing, use sandpaper to gently distress corners and edges for a vintage, weathered look.
The two-tone finish creates an appealing contrast between whitewashed and natural wood elements.
Make the whitewash more personalized by stenciling designs over it.
A layered color scheme may be achieved by combining whitewash with other soft hues such as gray or pale blue.
Conclusion
If you learn how to whitewash dark wood furniture, you can transform outdated pieces into stylish, versatile decor. With the right tools, techniques, and a little patience, you’ll enjoy the process as much as the result. With the steps outlined above, you’ll be able to achieve a beautiful, professional-looking finish that enhances the aesthetic of your home. Get started on your whitewashing journey today, grab your supplies, and get started!